Why it matters (beyond “nice to have”)
Photos already do a lot of heavy lifting in field service: proof of condition, proof of work, and context for anyone who wasn’t onsite. But a plain photo still asks the viewer to guess: What am I looking at? Which bolt? Which panel? Why is this important?
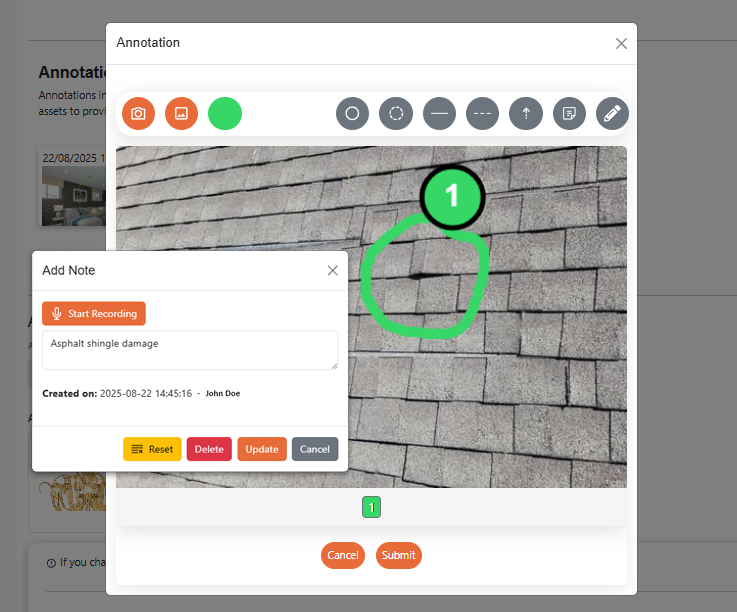
Photo Annotations remove the guesswork. A quick arrow, a box, a short note—suddenly the problem (or the fix) is obvious. That clarity speeds approvals, cuts down on callbacks, and keeps everyone—from dispatcher to customer—aligned on what happened and what comes next.
Think of it as turning raw evidence into a shared visual narrative of the job.
What Photo Annotations are (in practical terms)
-
Draw arrows to pinpoint a crack, leak, burnt connector, or loose lug.
-
Use boxes/circles/highlights to frame the exact area of interest.
-
Add short text that explains why it matters: “leak at flange,” “code label missing,” “clearance short by 2”.”
-
Apply stamps like BEFORE/AFTER or date/time for quick comparisons in reports.
-
Save non-destructively so the original is preserved; the annotated version sits alongside it.
-
Attach the annotated image right inside the job, so it’s part of the record and flows naturally into reports and handoffs.
The goal isn’t pretty artwork. It’s fast, unambiguous communication.
What changes when your team annotates consistently
1) Approval friction drops
A single annotated photo can replace a multi-message email thread. The customer or manager doesn’t need to decipher what they’re seeing—they see the exact fault and the implication (“seal failed—replacement required”). Approvals for additional work or parts move faster because the why is clear.
2) First-time-fix rates rise
When the next visit—or the parts order—depends on what was seen onsite, clarity is everything. Annotations help the parts desk get the right components and help the next technician arrive prepared. Less hunting, fewer surprises, more “done in one.”
3) Callbacks and disputes shrink
Annotated, time-stamped photos make scope and workmanship explicit. If the job was to replace the left actuator and the photo is clearly marked “left actuator replaced,” there’s far less room for disagreement later.
4) Closeout accelerates
Reports compile faster when the right photos already tell the story. Annotated BEFORE/AFTER pairs make the improvement visible. Accounting can bill sooner because the evidence is ready.
5) Knowledge spreads
Your best techs’ judgment becomes teachable. Over time, the library of annotated photos turns into a set of “job stories” that help new hires learn what to look for and what “good” looks like.
Where annotations add the most value (day-to-day scenarios)
-
Diagnosis: Circle a hairline crack; add “CO risk—replace HX.” Include a second arrow for “temporary patch installed.” Purchasing and safety both know what’s next.
-
Estimating and change orders: Highlight code issues (“clearance short—needs offset”), then link that image to the estimate line. Customers approve more confidently when they see the gap.
-
Install & QA: Mark vent direction, anchor locations, leveling shims, or torque labels. A quick BEFORE/AFTER pair turns into a crisp QA trail.
-
Warranty and returns: Photograph the part, annotate the serial, and note the failure symptom. Returns and claims go smoother with less back-and-forth.
-
Handoffs: The next tech isn’t guessing. They open the job, scan the annotated photos, and know where to start and what to bring.
A lightweight way to roll it out
You don’t need a big project. Start small and standardize as you go:
-
Pick three conventions your team will use everywhere (e.g., red arrow = defect, green check = pass, yellow box = watchlist).
-
Adopt BEFORE/AFTER pairs for repairs and installs. They’re powerful in reports and eliminate ambiguity.
-
Keep notes short and specific. “Valve seized—replacement” beats “issue found.”
-
Tie annotated photos to what they affect (line item, asset, location) when relevant so history stays meaningful.
-
Do quick share-outs. Once a week, highlight a great example. Good patterns spread fast when people see them.
What “good” looks like (micro-examples)
-
Plumbing:
-
Before: Arrow to corroded stop, note: “Seized—cannot isolate.”
-
After: Arrow to new quarter-turn stop, note: “Replaced. Verified no leaks.”
-
-
HVAC:
-
Before: Circle cracked heat exchanger cell; note: “CO risk.”
-
After: Box around new exchanger; stamp BEFORE/AFTER; note: “Combustion test passed.”
-
-
Electrical:
-
Before: Highlight double-lug on breaker; note: “Not rated for two conductors.”
-
After: Arrow to new subfeed breaker; note: “Corrected per spec.”
-
Each example is 10 seconds of markup that saves minutes of explanation later.
Do / Don’t (keeps things fast and readable)
Do
-
Use 1–2 annotations per photo when possible—enough to remove ambiguity.
-
Put the most important arrow or note first.
-
Use consistent phrasing so reports read cleanly (“Replaced,” “Adjusted,” “Verified”).
Don’t
-
Cover the photo in shapes—signal gets lost.
-
Write paragraphs—photos are for punchy labels; longer context belongs in job notes.
-
Mix color meanings—if red means defect, keep it that way.
How it flows into reports and customer communication
Because annotated photos live with the job, they’re easy to pick for the final report. A clean sequence—Before (problem) → Work in progress (if needed) → After (result)—tells a story customers trust. It’s clear, professional, and defensible if questions come up later. Internally, those same images help your team audit quality and reconcile parts to line items.
Frequently asked (kept short)
Does annotation overwrite the original?
No. The original stays intact; the annotated version is saved alongside it.
Can customers see annotated photos?
Yes—include them when you generate job reports or share from the job.
What if I annotated the wrong spot?
Simply save a corrected version or upload a new annotated copy—the history remains clear.
The bottom line
Photo Annotations aren’t “extra work.” They’re a tiny habit that prevents rework, accelerates decisions, and preserves margin. A couple of arrows and a five-word note can be the difference between a same-day approval and a week of back-and-forth, or between a neat closeout and a callback.
Make it easy, make it consistent, and let the photos do the talking.


